Support Access Diagrams
Connector code snippets on this page are inlined from trustedlogin-connector 2.0.2 (August 19, 2026). The Connector source repo is private; these snippets are the citable record going forward and won't auto-update — if the referenced function changes materially in a later release, this page should be refreshed alongside it.
TrustedLogin is designed to be simple, secure, and easy way for users to grant access to a support team. Thanks to the design of the service, login credentials are end-to-end encrypted and unable to be accessed by TrustedLogin.
Below are simplified visualizations of the flow of data between the various components of TrustedLogin.
The three parts of TrustedLogin:
- TrustedLogin service, running on app.trustedlogin.com
- Connector plugin, running on the software provider's website
- Client, either as a stand-alone TrustedLogin plugin or the SDK integrated with a WordPress plugin or theme
Together, these three components allow for site access to be granted securely and with minimal effort.
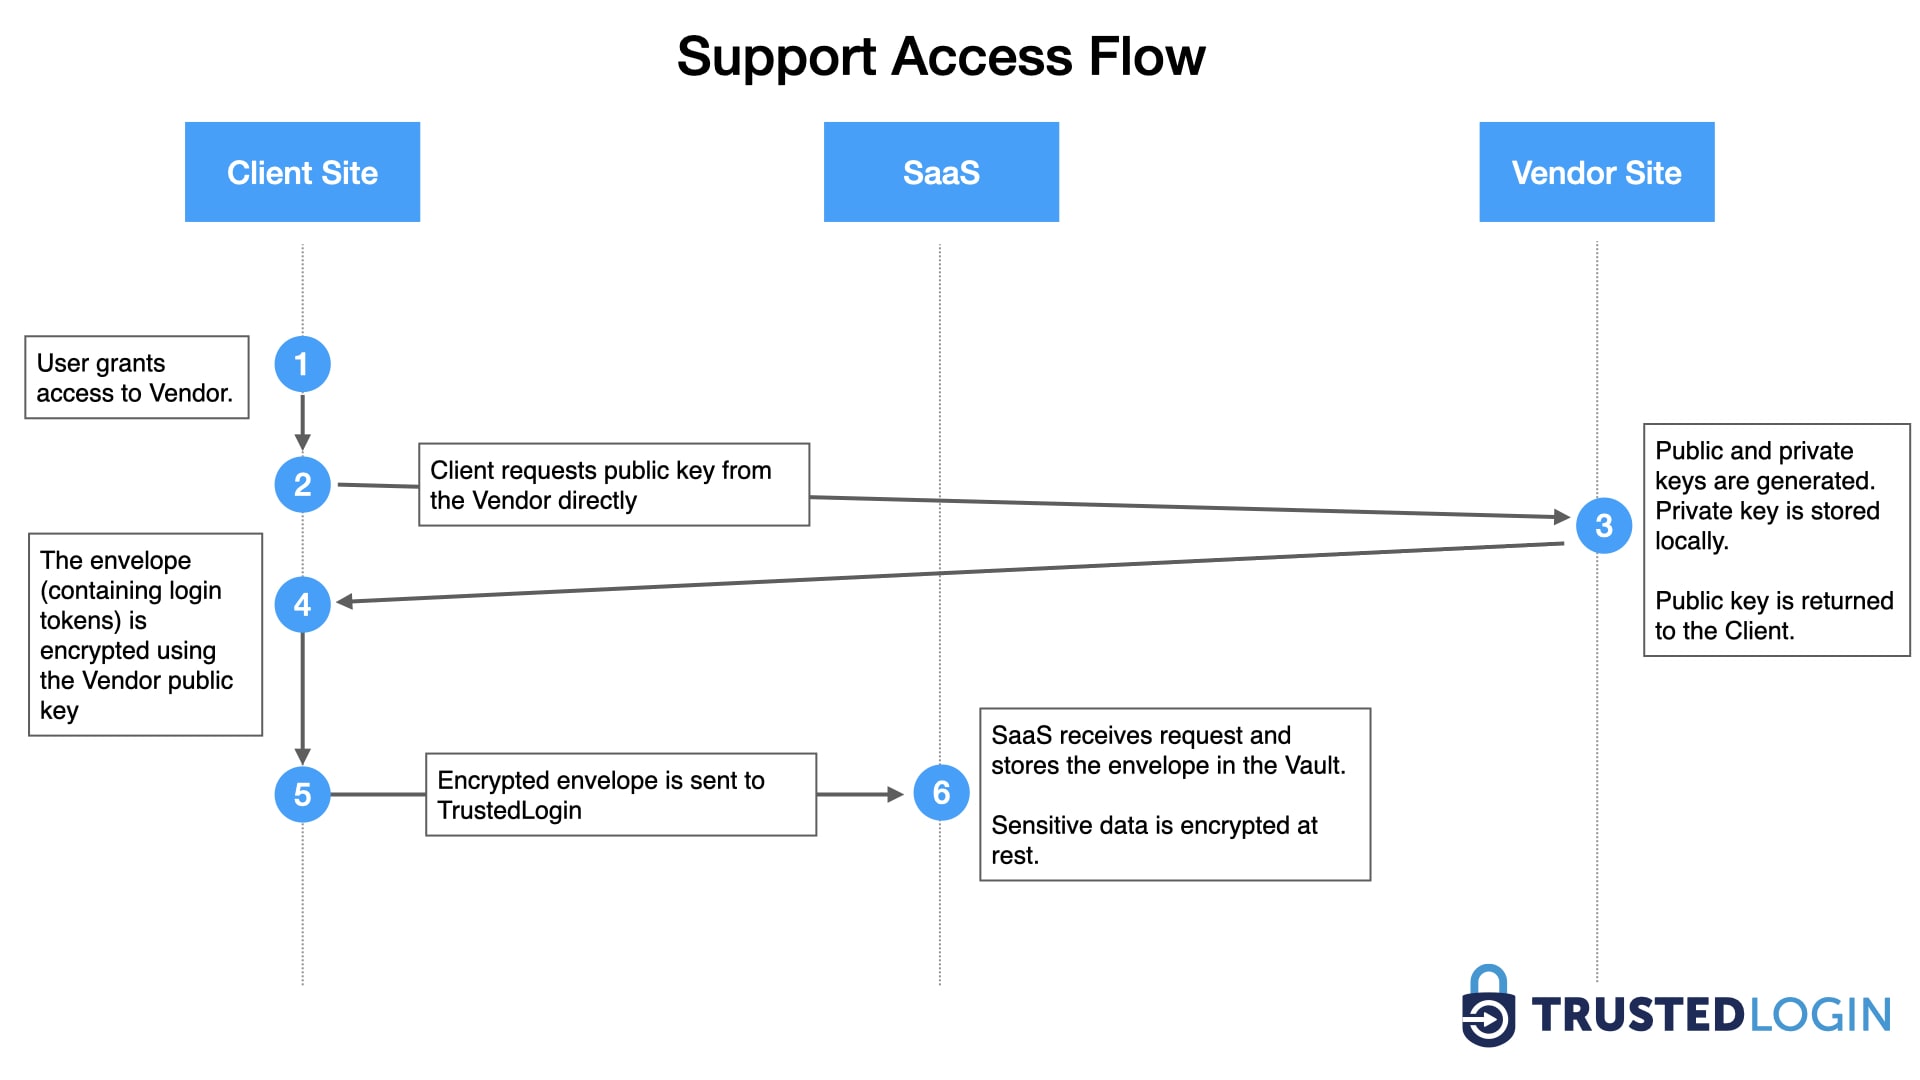
Support Access Flow
What happens when a customer or client grants access to their website:
Step 1: User Grants Access
User grants access to Vendor via the Client SDK.
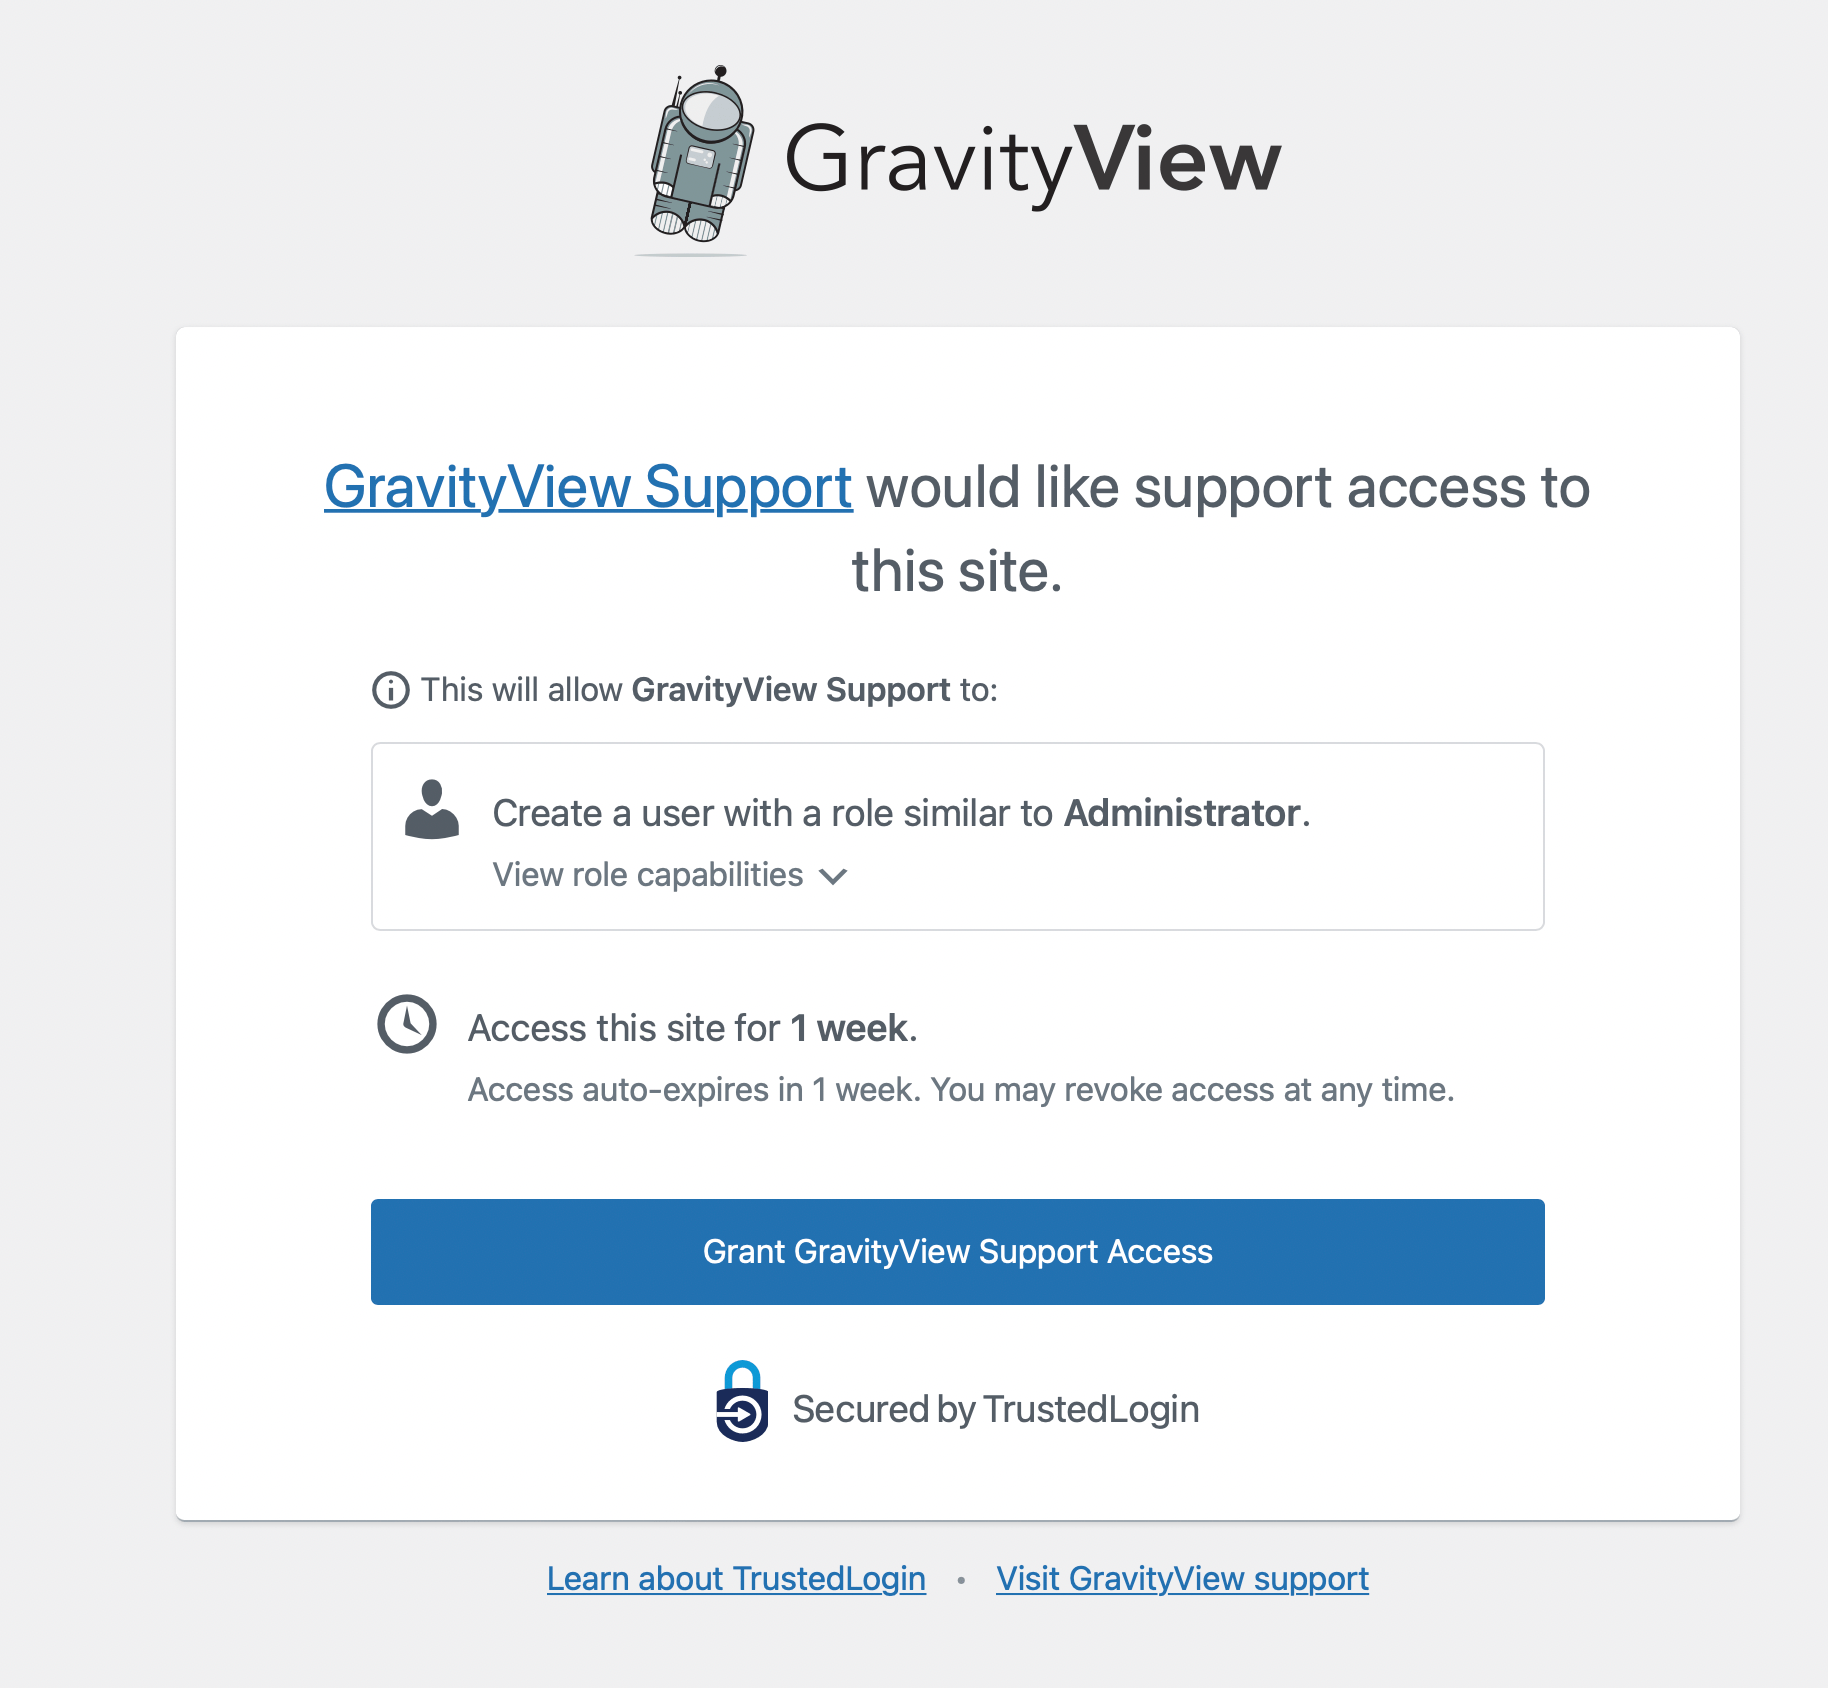
This creates a user in WordPress with the defined roles. A "User Identifier" is created and a hash is stored in the WordPress user meta (see \TrustedLogin\Client\SupportUser::setup()). The User Identifier will be used when the Vendor logs in.
In addition, a Secret ID is generated and added to the usermeta. This hash is used as the storage ID when the site is added to the SaaS Vault.
Step 2: Public Key is Requested
The Client SDK requests the public key from the wp-json/trustedlogin/v1/public_key endpoint from the Vendor's website.
The public key is fetched by default from the URL defined in the vendor/website setting. It's possible to override this using the trustedlogin/{namespace}/vendor/public_key/endpoint filter.
Step 3: Public Key is Generated
The public key request is handled by \TrustedLogin\Vendor\Endpoints\PublicKey::get(), which uses \TrustedLogin\Vendor\Encryption::generateKeys() to generate two sets of encryption keys (crypto_sign and crypto_box key pairs) but only returns the crypto_box public key.
Endpoints/PublicKey.php — get()
public function get( \WP_REST_Request $request ) {
	$public_key = \trustedlogin_connector()->getPublicKey();

	$response = new \WP_REST_Response();

	if ( ! is_wp_error( $public_key ) ) {
		$data = array(
			'publicKey' => $public_key,
		);
		$response->set_data( $data );
		$response->set_status( self::PUBLIC_KEY_SUCCESS_STATUS );
	} else {
		$response->set_status( self::PUBLIC_KEY_ERROR_STATUS );
	}

	return $response;
}
Encryption.php — generateKeys() (key generation, trimmed)
private function generateKeys( $update = true ) {

	if ( ! function_exists( 'sodium_crypto_box_keypair' ) ) {
		return new WP_Error( 'sodium_not_exists', 'Sodium isn\'t loaded. Upgrade to PHP 7.0 or WordPress 5.2 or higher.' );
	}

	try {
		$bob_box_kp        = \sodium_crypto_box_keypair();
		$bob_box_secretkey = \sodium_crypto_box_secretkey( $bob_box_kp );
		$bob_box_publickey = \sodium_crypto_box_publickey( $bob_box_kp );

		$bob_sign_kp        = \sodium_crypto_sign_keypair();
		$bob_sign_publickey = \sodium_crypto_sign_publickey( $bob_sign_kp );
		$bob_sign_secretkey = \sodium_crypto_sign_secretkey( $bob_sign_kp );

		$keys = (object) array(
			'private_key'      => \sodium_bin2hex( $bob_box_secretkey ),
			'public_key'       => \sodium_bin2hex( $bob_box_publickey ),
			'sign_private_key' => \sodium_bin2hex( $bob_sign_secretkey ),
			'sign_public_key'  => \sodium_bin2hex( $bob_sign_publickey ),
		);
		// … persists $keys (and demotes the prior keypair to a
		// short-lived historical keyring) when $update is true.
Step 4: Envelope Created & Encrypted
The envelope is generated and encrypted using Vendor public keys.
The Client \TrustedLogin\Client\Envelope::get() uses \TrustedLogin\Client\Encryption::generate_keys(), \TrustedLogin\Client\Encryption::encrypt(), \TrustedLogin\Client\Encryption::get_vendor_public_key().
The Vendor's public key is stored in the Client using the WordPress options table. The key expires after 10 minutes and will be re-fetched.
Step 5: Client POSTs Envelope to SaaS
The Client SDK, using, \TrustedLogin\SiteAccess::sync_secret() makes a POST request to https://app.trustedlogin.com/api/v1/sites. This is handled by \App\Http\Controllers\SiteController::createSite(). See endpoint documentation.
Step 6: SaaS Stores Envelope in Vault
In the SaaS, SiteController::createSite() generates Vault tokens to create a secret and stores the envelope in the Vault.
The SiteCreatedEvent() event is triggered in Laravel. This logs the event to Elasticsearch.
The successful response from the SaaS to the Client is:
{ "success": true }
The unsuccessful response is:
{ "message": "'Error', or \Exception::getMessage() value." }
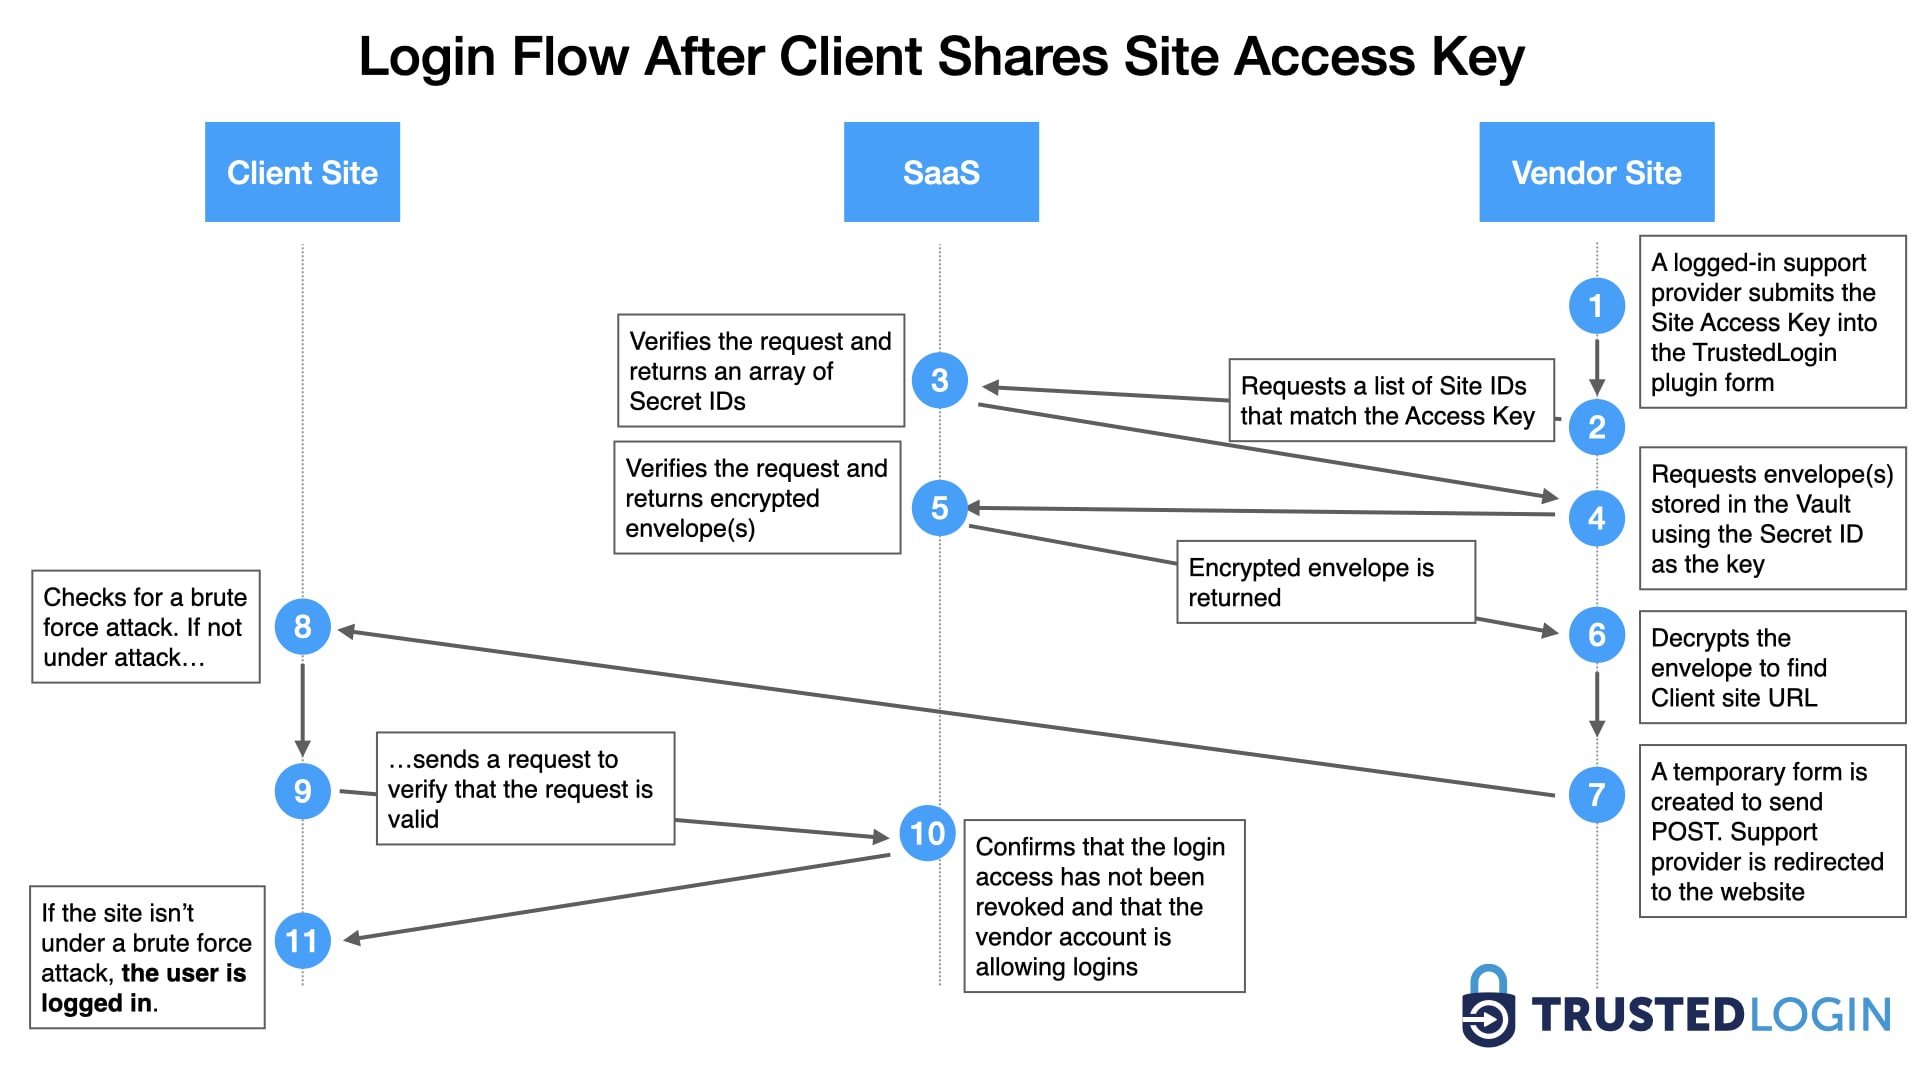
Support Logging Into a Customer/Client Website
Step 1: A Person Submits Site Access Form
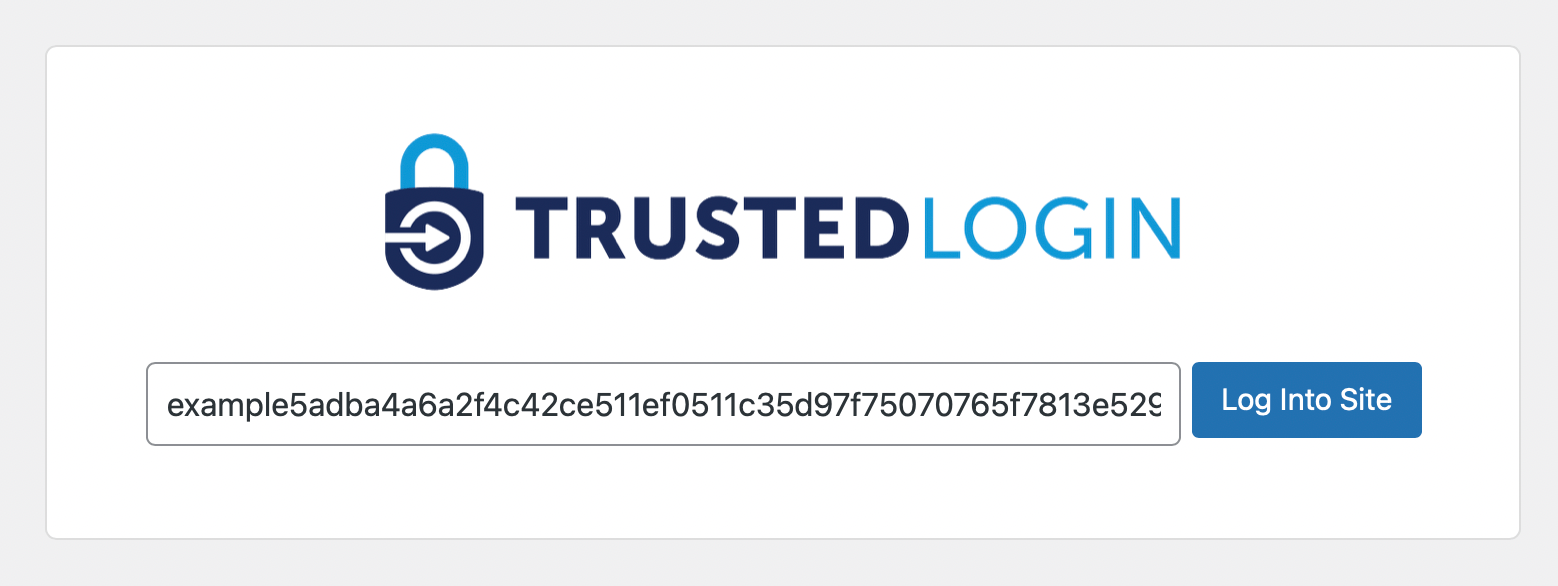
The form submits a POST HTTP request via AJAX that is received by the TrustedLogin\Vendor\AccessKeyLogin::handle() method.
Receiving that request, TrustedLogin\Vendor\AccessKeyLogin::verifyGrantAccessRequest() verifies that the nonce is valid and that the request is coming from inside the site.
In addition, TrustedLogin\Vendor\Traits\VerifyUser::verifyUserRole() checks to make sure the user is logged-in and has one or more of the roles that are required to access the site.
AccessKeyLogin.php — handle() (request verification + role gate, trimmed)
public function handle( array $args = array(), bool $trusted = false ) {
	if ( ! $trusted ) {
		$verified = $this->verifyGrantAccessRequest();

		if ( is_wp_error( $verified ) ) {
			return $verified;
		}
	}

	// … reads/sanitizes the access key + account ID from $args or
	// request superglobals, then validates the access key length.

	if ( ! $this->verifyUserRole( $teamSettings ) ) {
		return new \WP_Error(
			self::SLUG_INVALID_USER_ROLE,
			esc_html__( 'You do not have a role that is allowed to provide support for this team.', 'trustedlogin-connector' ),
			// …
AccessKeyLogin.php — verifyGrantAccessRequest()
public function verifyGrantAccessRequest() {

	if ( ! Helpers::get_post_or_get( self::ACCESS_KEY_INPUT_NAME ) ) {
		$this->log( 'No access key sent.', __METHOD__, 'error' );
		return new \WP_Error( 'no_access_key', esc_html__( 'No access key was sent with the request.', 'trustedlogin-connector' ) );
	}

	if ( ! Helpers::get_post_or_get( self::ACCOUNT_ID_INPUT_NAME ) ) {
		$this->log( 'No account id sent.', __METHOD__, 'error' );
		return new \WP_Error( 'no_account_id', esc_html__( 'No account id was sent with the request.', 'trustedlogin-connector' ) );
	}

	$nonce = Helpers::get_post_or_get( self::NONCE_NAME, 'sanitize_text_field' );

	if ( ! $nonce ) {
		$this->log( 'No nonce set. Insecure request.', __METHOD__, 'error' );
		return new \WP_Error( 'no_nonce', esc_html__( 'No nonce was sent with the request.', 'trustedlogin-connector' ) );
	}

	$valid = wp_verify_nonce( $nonce, self::NONCE_ACTION );

	if ( ! $valid ) {
		$this->log( 'Nonce is invalid; could be insecure request. Refresh the page and try again.', __METHOD__, 'error' );
		return new \WP_Error( 'bad_nonce', esc_html__( 'The nonce sent with the request was invalid or expired. Refresh the page and try again.', 'trustedlogin-connector' ) );
	}

	return true;
}
Traits/VerifyUser.php — verifyUserRole()
public function verifyUserRole( TeamSettings $settings ) {

	if ( ! is_user_logged_in() ) {
		return false;
	}

	$_usr       = get_userdata( get_current_user_id() );
	$user_roles = $_usr->roles;

	if ( ! is_array( $user_roles ) ) {
		return false;
	}

	$required_roles = $settings->get( 'approved_roles' );

	$intersect = array_intersect( $required_roles, $user_roles );

	if ( 0 < count( $intersect ) ) {
		return true;
	}

	return false;
}
Step 2: Vendor Requests List of Matching Site IDs
The Connector plugin requests a list of Site IDs that match that access key by sending a POST request to the accounts/{$account_id}/sites/ SaaS endpoint.
The request includes an Authorization: Bearer {hashed private key} header as well as the following body:
{
  "searchKeys": [ "The submitted Site Access Key"]
}
Step 3: SaaS Verifies Request and Returns Site IDs
The SaaS verifies the hashed Bearer token passed in the Authorization header using \App\Http\Middleware\CheckPrivateKey::handle().
Then the SaaS checks to make sure the Vendor account isn't in "Pause Mode", which is triggered by brute force attempts. When Pause Mode is enabled, new access may be granted, but site login and lookups are restricted. See /Http/Middleware/CheckPauseMode.php.
\App\Http\Controllers\SiteController::siteByLicenseOrAccessKeys() is called to retrieve a list of sites stored in the Vault. Read the endpoint documentation.
An array of Secret IDs is returned. These are not the envelope itself; Secret IDs refer to the IDs of Vault secrets.
{
  "accessKey1": [
    "secretId1"
  ],
  "accessKey2": [
    "secretId2",
    "secretId3"
  ]
  "accessKey3": [
    "secretId2",
    "secretId3"
  ]
}
Step 4: Connector Plugin Requests Matching Envelope(s) from SaaS
The Connector plugin uses the Secret IDs to retrieve the envelopes from the Vault.
In addition to the Bearer token, the request generates a signed nonce in TrustedLogin\Vendor\Encryption::createIdentityNonce(). The method:
- Generates a cryptographic nonce (in
TrustedLogin\Vendor\Encryption::generateNonce()usingrandom_bytes()), - Signs the nonce with the
sign_private_keypair (inTrustedLogin\Vendor\Encryption::sign(), usingsodium_crypto_sign_detached()), and - Verifies that the signed nonce has been properly generated (using
sodium_crypto_sign_verify_detached())
The nonce and signed nonce are both sent in the request, helping to verify that this site is indeed the sender of the data.
Encryption.php — createIdentityNonce()
public function createIdentityNonce() {

	$unsigned_nonce = $this->generateNonce();

	if ( is_wp_error( $unsigned_nonce ) ) {
		return $unsigned_nonce;
	}

	$key = $this->getPrivateKey( 'sign_private_key' );

	if ( is_wp_error( $key ) ) {
		return $key;
	}

	$signed_nonce = $this->sign( $unsigned_nonce, $key );

	if ( is_wp_error( $signed_nonce ) ) {
		return $signed_nonce;
	}

	$verified = $this->verifySignature( $signed_nonce, $unsigned_nonce );

	if ( is_wp_error( $verified ) ) {
		return $verified;
	}

	$identity = array();
	$identity['nonce']  = base64_encode( $unsigned_nonce ); // phpcs:ignore WordPress.PHP.DiscouragedPHPFunctions.obfuscation_base64_encode
	$identity['signed'] = base64_encode( $signed_nonce ); // phpcs:ignore WordPress.PHP.DiscouragedPHPFunctions.obfuscation_base64_encode

	return $identity;
}
Encryption.php — generateNonce() and sign()
private function generateNonce() {

	if ( ! function_exists( 'sodium_bin2hex' ) ) {
		return new WP_Error( 'sodium_not_exists', 'Sodium isn\'t loaded. Upgrade to PHP 7.0 or WordPress 5.2 or higher.' );
	}

	try {
		return \sodium_bin2hex( \random_bytes( SODIUM_CRYPTO_BOX_NONCEBYTES ) );
	} catch ( \SodiumException $e ) {
		return new WP_Error( 'sodium-error', $e->getMessage() );
	}
}

private function sign( $data, $key ) {

	try {
		if ( empty( $data ) || empty( $key ) ) {
			return new WP_Error( 'no_data', 'No data provided.' );
		}

		if ( ! function_exists( 'sodium_crypto_sign_detached' ) ) {
			return new WP_Error( 'sodium_not_exists', 'Sodium isn\'t loaded. Upgrade to PHP 7.0 or WordPress 5.2 or higher.' );
		}

		$signed = \sodium_crypto_sign_detached( $data, \sodium_hex2bin( $key ) );

		return $signed;
	} catch ( \SodiumException $e ) {
		return new WP_Error( 'sodium-error', $e->getMessage() );
	}
}
A POST request is made to sites/{account_id}/{secret_id}/get-envelope to retrieve the envelope from the Vault. The Bearer token is passed in the Authorization header, and a X-TL-TOKEN header is also sent. The X-TL-TOKEN header is a hash of the Vendor private and public keys.
Step 5: SaaS Verifies Request and Returns Envelope(s)
The SaaS verifies the hashed Bearer token and ensures that the Vendor account isn't in Pause Mode (see Step 3).
The SaaS verifies the signed nonce using \App\Http\Middleware\CheckSignedNonce::handle().
The request is handled by \App\Http\Controllers\SiteController::getEnvelope(), which retrieves the envelope from the Vault.
Inside getEnvelope(), the X-TL-TOKEN token is verified against the Vendor's account information.
The envelope with encrypted credentials is returned to the Vendor.
Step 6: Connector Plugin Receives & Decrypts Envelope
The Connector plugin receives the envelope. It includes the Site URL associated with the Site Access Key but not the endpoint, which is required to log in.
The Connector plugin decrypts the envelope and extracts the credentials, then cryptographically generates the URL to access Client site (using TrustedLogin\Vendor\TrustedLoginService::envelope_to_url()).
TrustedLoginService.php — envelope_to_url() (signature, decrypt call, and URL assembly; the historical-keyring fallback and logging in between are trimmed)
public function envelope_to_url( $envelope, $return_parts = false ) {

	if ( is_wp_error( $this->verify_envelope( $envelope ) ) ) {
		return new \WP_Error( 'malformed_envelope', 'The data received is not formatted correctly' );
	}

	$trustedlogin_encryption = $this->plugin->getEncryption();

	try {
		$decrypted_identifier = $trustedlogin_encryption->decryptCryptoBox( $envelope['identifier'], $envelope['nonce'], $envelope['publicKey'] );

		// … on decryption_failed, walks Encryption::getKeypairHistory()
		// for a retired keypair still inside its 20-minute retention
		// window, so a client that cached our public key across a
		// rotation can still complete the login.

		if ( is_wp_error( $decrypted_identifier ) ) {
			return $decrypted_identifier;
		}

		// Validate the envelope's siteUrl against the integrator's
		// configured return-host allowlist before using it for redirects.
		$site_url_check = $this->validate_return_site_url( (string) $envelope['siteUrl'] );

		if ( is_wp_error( $site_url_check ) ) {
			return $site_url_check;
		}

		$parts = array(
			'siteurl'    => $site_url_check,
			'identifier' => $decrypted_identifier,
		);
	} catch ( \Exception $e ) {
		return new \WP_Error( $e->getCode(), $e->getMessage() );
	}

	$endpoint = $trustedlogin_encryption::hash( $parts['siteurl'] . $parts['identifier'] );

	if ( is_wp_error( $endpoint ) ) {
		return $endpoint;
	}

	$loginurl = $parts['siteurl'] . '/' . $endpoint . '/' . $parts['identifier'];

	if ( $return_parts ) {
		return array(
			'siteurl'    => $parts['siteurl'],
			'loginurl'   => $loginurl,
			'endpoint'   => $endpoint,
			'identifier' => $parts['identifier'],
		);
	}

	return $loginurl;
}
The site URL and the access parts are returned as an AJAX response, completing the request started in Step 1.
Step 7: Connector Plugin POSTs to Client Site
A temporary form is created using JavaScript with the Client Site URL set as the form action property. A POST request is submitted, preventing the submitted data from being logged.
components/AccessKeyForm.js — form submit
<form
    aria-label={__("Log In Using Access Key", "trustedlogin-connector")}
    onSubmit={handler}
    id="access-key-form"
    method={"POST"}
    action={redirectSite ? redirectSite.siteurl : null}
    className="flex flex-col py-6 space-y-6 justify-center">
// Once we have redirectSite, submit the form.
useEffect(() => {
  if (!redirectSite) {
    return;
  }
  // Native form.submit() bypasses the onSubmit handler entirely —
  // the browser POSTs directly to the form's `action`
  // (redirectSite.siteurl). Re-run the same scheme guard the manual
  // submit path uses, so an attacker who can shape redirectSite can't
  // route the admin's session cookies to a non-http(s) destination.
  if (!httpUrl(redirectSite.siteurl) || !httpUrl(redirectSite.loginurl)) {
    setErrorMessage(
      __("Invalid redirect target. Refusing to log in.", "trustedlogin-connector")
    );
    return;
  }
  document.getElementById("access-key-form").submit();
}, [redirectSite]);
The form submits the following to the Client Site URL:
[
  method: 'POST',
  action: 'trustedlogin',
  endpoint: {endpoint},
  identifier: {identifier}
]
When the form submits, the user on the Vendor website is automatically redirected to the Client site.
Step 8: Client Verifies Login Request
The login request is received by the Client in {Client}\TrustedLogin\Endpoint::maybe_login_support().
The SDK performs security checks, including:
- The raw User Identifier value is found (using
{Client}\TrustedLogin\Endpoint::get_user_identifier_from_request()) and then verified (using{Client}\TrustedLogin\SecurityChecks::verify()). - The SDK checks whether a brute-force attack is underway (via
{Client}\TrustedLogin\SecurityChecks::do_lockdown()). If an attack is determined, the code prevents login and enters Lockdown Mode. See the Security doc for more information about Lockdown Mode. - The SDK determines whether the user access period has expired. If it has, the user is deleted and the login is prevented.
- The SDK sends a request to the SaaS to confirm that the validity of the request.
The following information is sent to sites/{secret_id}/verify-identifier using a HTTP POST request:
{secret_id} Refers to the Secret ID stored in user meta. It is returned using {Client}\TrustedLogin\SupportUser::get_secret_id().
{
  'timestamp': time(),
  'user_agent': $_SERVER['HTTP_USER_AGENT'],
  'user_ip': $this->get_ip(),
  'site_url': get_site_url(),
}
Step 9: SaaS Also Verifies Login Request
The SaaS receives the verify-identifier request and processes it using App\Http\Controllers\VerifyIdentifierController::handle().
The method verifies that the secret still exists in the Vault (it hasn't been deleted), and that the Vendor account is not in Pause Mode.
If success, the SaaS returns an empty JSON response [] with a 204 HTTP status code.
Possible error responses are indicated using the HTTP status codes 423 and 404:
423: The Vendor account is in Pause Mode404: The Secret ID does not match any secrets in the Vault
Step 10: Client Logs User In
If the security checks pass in Step 8 and 9, the SDK calls {Client}\TrustedLogin\Endpoint::login() to log the support user in.
The user is logged-in by calling wp_set_current_user(), wp_set_auth_cookie() and do_action( 'wp_login' ).
Yay! 🎉 The user's now logged-in.
Step 11: Action Is Triggered
After login, the SDK triggers the following WordPress action: trustedlogin/{namespace}/logged_in. This allows other plugins to perform actions and to trigger webhooks.
The SDK hooks into the action to run any webhooks configured in the Config array.
Revoke Login
At any time, a website administrator may revoke TrustedLogin access. When access is revoked, the Client sends a HTTP DELETE request to the sites/{secret_id} endpoint along with a X-TL-TOKEN header.
The body of the request is:
{
  'publicKey': {Client SDK API Key}
}
If the public key has been cycled, the request will fail.
Handled by \App\Http\Controllers\SiteController::deleteSite().
Possible responses are indicated using the HTTP status codes:
201: Secret successfully deleted200: Secret failed to be deleted in\App\Http/Clients/Vault::deleteSite()404: The Secret ID does not match any secrets in the Vault or there500: An exception occurred